Asset Tracker (Extension)
Overview
The Asset Tracker allows you to keep track of assets in your company and to record depreciation based on a custom depreciation schedule.
Video
Installation
Access
To open the Asset Tracker, navigate to Accounting and click Extensions in the Tools section. Highlight Asset Tracker and click Execute.
Setup
Create Asset Groups
Create Asset Groups to organize your assets in an easy to find manner. To create an asset group:
-
Click Create and choose Group .
-
Give the Group a
Description
(Name).
-
Click
Save and Close.
Choose a
parent
group, if desired.
Changing Parent Group
To change the parent group of a group either
a) drag the group into the parent group or
b) double click the group, change the parent and click save and close.
Use
Creating an Asset
To create an asset,
-
Click
Create / New.
-
Choose a Asset
Parent
Group.
-
Give the asset a
description.
-
Choose an asset
Type.
Additional asset types may be created by clicking
Show All
and then
Create
and giving the asset type a
name
and clicking
Save and Close
.
-
Enter the
Model
.
-
Enter the
Serial Number
.
-
Click the
Click to Add Picture
to Add a Picture. Drag the picture file in the pop-up window and click
Ok
.
-
Enter the
Fixed Asset Account, Accumulated Depreciation Account and Depreciation Expense Account
.
-
Enter the
State
.
-
Enter the
Warehouse
location.
-
Enter a description of the
location
.
-
Click
Save.
-
Click the
Transactions
tab
-
Click
Record initial/acquisition value
and enter the
date
and the
value
in the pop-up window to enter the cost of the asset.
-
A journal entry will be created. Click
Save and Close
.
Creating a Depreciation Schedule
-
Click the
Depreciation Schedule
tab.
-
Click
Add Depreciation Schedule
.
-
Enter the Starting
Month
and
Year
.
-
Choose a
Depreciation Method.
-
Enter the useful life in
Years
or
Months
.
-
Enter the
Salvage Value
.
-
Click
Generate Schedule
. A schedule will be generated.
-
Click the
project / class
tab and enter a
project
and/or a
class
, if desired.
-
Click the
memo
tab and enter a
memo
, if desired.
-
Click
Save and Close
.
-
Depreciation transactions will be created automatically on the due date based on the schedule created.
Viewing a list of Assets
A list of assets appears when staring the extension and are organized by group. Double click the asset to view the transactions or asset detail.
Changing the Value of an Asset
-
From the list of assets, highlight the asset and click
More Actions / Edit / Change Asset Value.
-
Enter the difference in the change field to increase or decrease the value of the asset. Use a negative number to decrease the value.
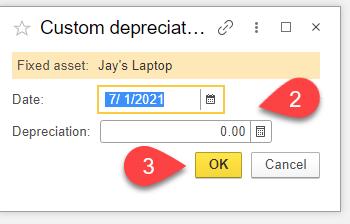
Entering a custom depreciation amount not on the schedule
-
From the list of assets, highlight the asset and click More Actions / Generate/ Add Custom Depreciation.
-
Enter the date and the amount .
-
Click
Ok.
The accounting entries will be created.
Disposing of the Asset
-
From the list of assets, highlight the asset and click More Actions / Generate / Fixed Asset Disposal.
-
Enter the Date and the amount .
-
Click
Save and Close
. The accounting entries will be created.
Need help applying this to your business?
See how CustomBooks™ can support your accounting and inventory workflow
If you are evaluating CustomBooks™ or want help setting up workflows for your business, explore the product or schedule a conversation with our team.
Already using CustomBooks™? Explore the Knowledge Base or contact support for product help.
Related Articles
Admin Tools: Extensions (Settings)
Overview The Extensions Settings feature in the Admin Tool allows users to view, manage, and configure the values set for extensions installed from the Extensions Store. This page allows users to quickly review how each installed extension is ...Managing Extensions
Installing Extensions To install an extension, Click the Extensions menu item in the main menu Click Extensions Catalog. Double click the extension you wish to install. In the pop-up window, click install. Usage instructions are included in the ...Inventory KPI Dashboard (Extensions)
Overview The Inventory KPI Dashboard is a visual display of the critical information decision-makers need to achieve their objectives. With four distinct reports, this tool allows you to track all inventory on a single page, providing a quick ...Gross Margin Report (Extensions)
Overview The Gross Margin Report looks at the percentage and profit margin based solely on sales and the cost of producing those sales. For financial reporting, it gives you a picture of how much revenue is left after deducting all the direct costs ...Multi-currency Balance Sheet Report (extension)
Introduction Now available with multiple currencies, CustomBooks™’s Balance Sheet report gives business owners the ability to manage the company's assets, liabilities and shareholders equity in the default or target currencies. Installation Please ...