CustomBooks™ Cloud Commerce
Overview and Features
The Cloud Commerce feature helps you manage your online sales by connecting your accounting software to ShipStation or your Square POS system. Instead of manual data entry, this feature automates the flow of information from your online store into CustomBooks™.
How the Connection Works
ShipStation
It is important to know that for online stores, CustomBooks™ does not talk directly to your website. Instead, ShipStation acts as the middleman or "bridge."
- Your Online Store: Customers place orders on your website or marketplace.
- ShipStation: Your store sends those order details to ShipStation to handle shipping.
- CustomBooks™: Cloud Commerce pulls the data from ShipStation and records it in your books.
Square
Unlike online stores, the Square POS system connects directly to CustomBooks™.
- Square POS: You process a sale in person or online through Square.
- Direct Sync: CustomBooks™ pulls your Square payment and sales data directly into the system.
- CustomBooks™: Your front-of-house sales and back-office accounting stay perfectly matched.
Key Features
- Real-Time Access: Use any device with an internet connection to see your online store data. This is perfect for business owners who manage multiple locations or work on the go.
- Single Dashboard Management: View and manage all orders, customers, and products in one place. This overview helps you track inventory levels and see your sales status at a glance.
- Automatic Sales & Inventory Updates: The system tracks sales, revenue, and customer behavior. It can even auto-generate Invoices, Shipments, and Cash Receipts in CustomBooks™ for you.
- One-Click Order Entry: Stop typing data twice. When an order comes in, the system automatically updates your inventory and creates an invoice, reducing mistakes.
- Batch Approvals: Instead of approving orders one by one, use the dashboard to review and approve multiple orders at once to save time.
- Connect to 100+ Marketplaces: Connect to top sites like Amazon, Etsy, eBay, and Shopify. You can even track these sales by Location within CustomBooks™.
Getting Started
Requirements
- To use this feature, you must have the Professional Plan with eCommerce plan.
- This feature requires ShipStation's V1 API (formerly known as ShipStation OpenAPI). Access to the V1 API is limited to ShipStation accounts on a Standard, Accelerate, or higher plan. Check out ShipStation's knowledge base to learn more about the ShipStation API.
How to Access Cloud Commerce
- Navigate to the Sales menu.
- Look under the Tools section, select Cloud Commerce.
Connecting CustomBooks™ to ShipStation or Square
To get started with Cloud Commerce, you will need to link your chosen sales management platform to CustomBooks™. Below are the requirements and instructions for connecting either ShipStation or Square.
ShipStation
Before integrating CustomBooks™ with ShipStation, please ensure your eCommerce selling channels (such as Amazon, Shopify, eBay, or Magento) are already connected to your ShipStation account. You should also be comfortable with processing and fulfilling orders within the ShipStation platform. For further guidance on using ShipStation, please visit their official support site.
Important Note on Data Synchronization: CustomBooks™ pulls order data from ShipStation only after an order has been marked as shipped within ShipStation. This timing may slightly adjust your standard workflow, as items are often picked, packed, shipped, and paid for on your eCommerce platform before the corresponding financial documents appear in CustomBooks™.
Once your sales channels are active and configured in ShipStation, you are ready to establish the connection.
To connect CustomBooks™ to ShipStation:
- Navigate to the Admin Panel.
- Select Integrations, then choose ShipStation.
- Click the gear icon, followed by the ShipStation button.
- Enter the API Key and API Secret (generated within your ShipStation account) and click Login.
For detailed, step-by-step instructions on configuring this connection, please read our full knowledge base article: Integrations: ShipStation: Setting Up ShipStation.
Below is a short video from our CustomBooks™ Product Perks series highlighting Cloud Commerce and demonstrating how to connect ShipStation.
Square POS
Integrating your Square Point of Sale (POS) system directly with CustomBooks™ seamlessly bridges your front-of-house sales with your back-office accounting. Because Square handles both the sale and the payment processing, this direct connection ensures that your daily transaction data flows straight into your financial records automatically, eliminating manual data entry.
To connect CustomBooks™ to your Square POS System:
- Navigate to the Sales menu.
- Under the Tools section, select Cloud Commerce.
- Click the Add Store button.
- Under the Stores options, click Square.
- Log in using your Square credentials (email or phone number and password) to authorize the connection.
For detailed, step-by-step instructions on configuring this connection, please read our full knowledge base article: Cloud Commerce: Square POS: Setting Up Square.
Gemini said
Understanding the Cloud Commerce Dashboard
The Cloud Commerce dashboard is your central hub for managing all data coming in from your connected sales channels. This is the "Staging Area" where you can review, manage, and approve information before it officially enters your accounting books.
Below is a quick guide to the different sections and fields you will use on this screen.
Store Controls
At the top of the dashboard, you will find the tools to manage your connected accounts:
- Add Store: Click this button to connect a new online store, aggregator (like ShipStation), or point of sale (like Square) to CustomBooks™.
- Store dropdown: Use this menu to switch between your different connected stores and view their specific data.
- Store Status: This indicator shows if your connection is currently active (e.g., "Online" with a timestamp of the last sync) or if it requires attention.
- Refresh Store: Click this button to manually pull the most up-to-date data from your connected store right away.
Navigation Tabs
The middle section of the dashboard is divided into tabs, organizing your data into three main categories: Lists, Transactions, and Other.
Lists
- Customers: Displays the list of customer profiles imported from your store.
- Items: Shows the products or inventory items synced from your sales channels.
- Locations: Displays the physical or virtual locations associated with your synced data.
- Sales People: Shows the sales representatives associated with the transactions (commonly used with Square POS).
Transactions
- Orders: Displays pending and completed sales orders synced from platforms like ShipStation.
- Cash Sales (Square): Displays direct, finalized sales pulled specifically from your connected Square POS system.
Other
- Approval History: A log of all the items and transactions you have already approved and sent into CustomBooks™.
- Additional Transactions: Displays auto-generated related documents created during the approval process, such as Shipments, Sales Invoices, and Cash Receipts.
- Trash: Holds any data or transactions you have chosen to delete or ignore.
Command Bar & List Management
Just above your data rows, the command bar gives you the tools to interact with your lists efficiently:
- Mark All: Selects every item currently visible on the page.
- Unmark All: Deselects all currently selected items.
- Batch Actions: Allows you to perform a single action on multiple selected items at once, such as "Approve Selected" or "Move to Trash."
- Sort: Click these arrows to organize the selected column in ascending (A-Z, lowest to highest) or descending (Z-A, highest to lowest) order.
- Export: Downloads the current list view into a spreadsheet file for your records.
- Refresh: Refreshes the specific list you are currently viewing.
- Columns: Lets you customize your view by adding or removing specific columns, or restoring the layout to its default settings.
- Date Filter: Narrows down the displayed list to a specific date or date range. You can click the current filter (e.g., <all dates>) to select your desired timeframe.
- Search: A text box that lets you quickly find specific records—such as a customer's name, an order number, or a product—within the current list.
- List Pagination: Found at the bottom of the screen, these controls (First, Previous, Next, Last) allow you to flip through multiple pages of data and adjust how many items you see per page.
Matching Status Filters
Located just below the command bar, these filters help you quickly identify which records are ready for approval and which ones need your attention before they can be added to your books:
- Fully Matched: Displays transactions or items where all details (such as the customer and the products) have been successfully linked to existing records in CustomBooks™ or are ready to be added as new records without any conflicts. These are generally ready for your immediate approval.
- Not Matched: Displays transactions or items that require your review. This happens when the system cannot automatically find a matching customer or product in CustomBooks™. You will need to manually link them to an existing record or create a new one before you can approve the transaction.
- All: Displays the complete list of records, combining both your "Fully Matched" and "Not Matched" items into a single view.
Managing Lists and Approving Sales
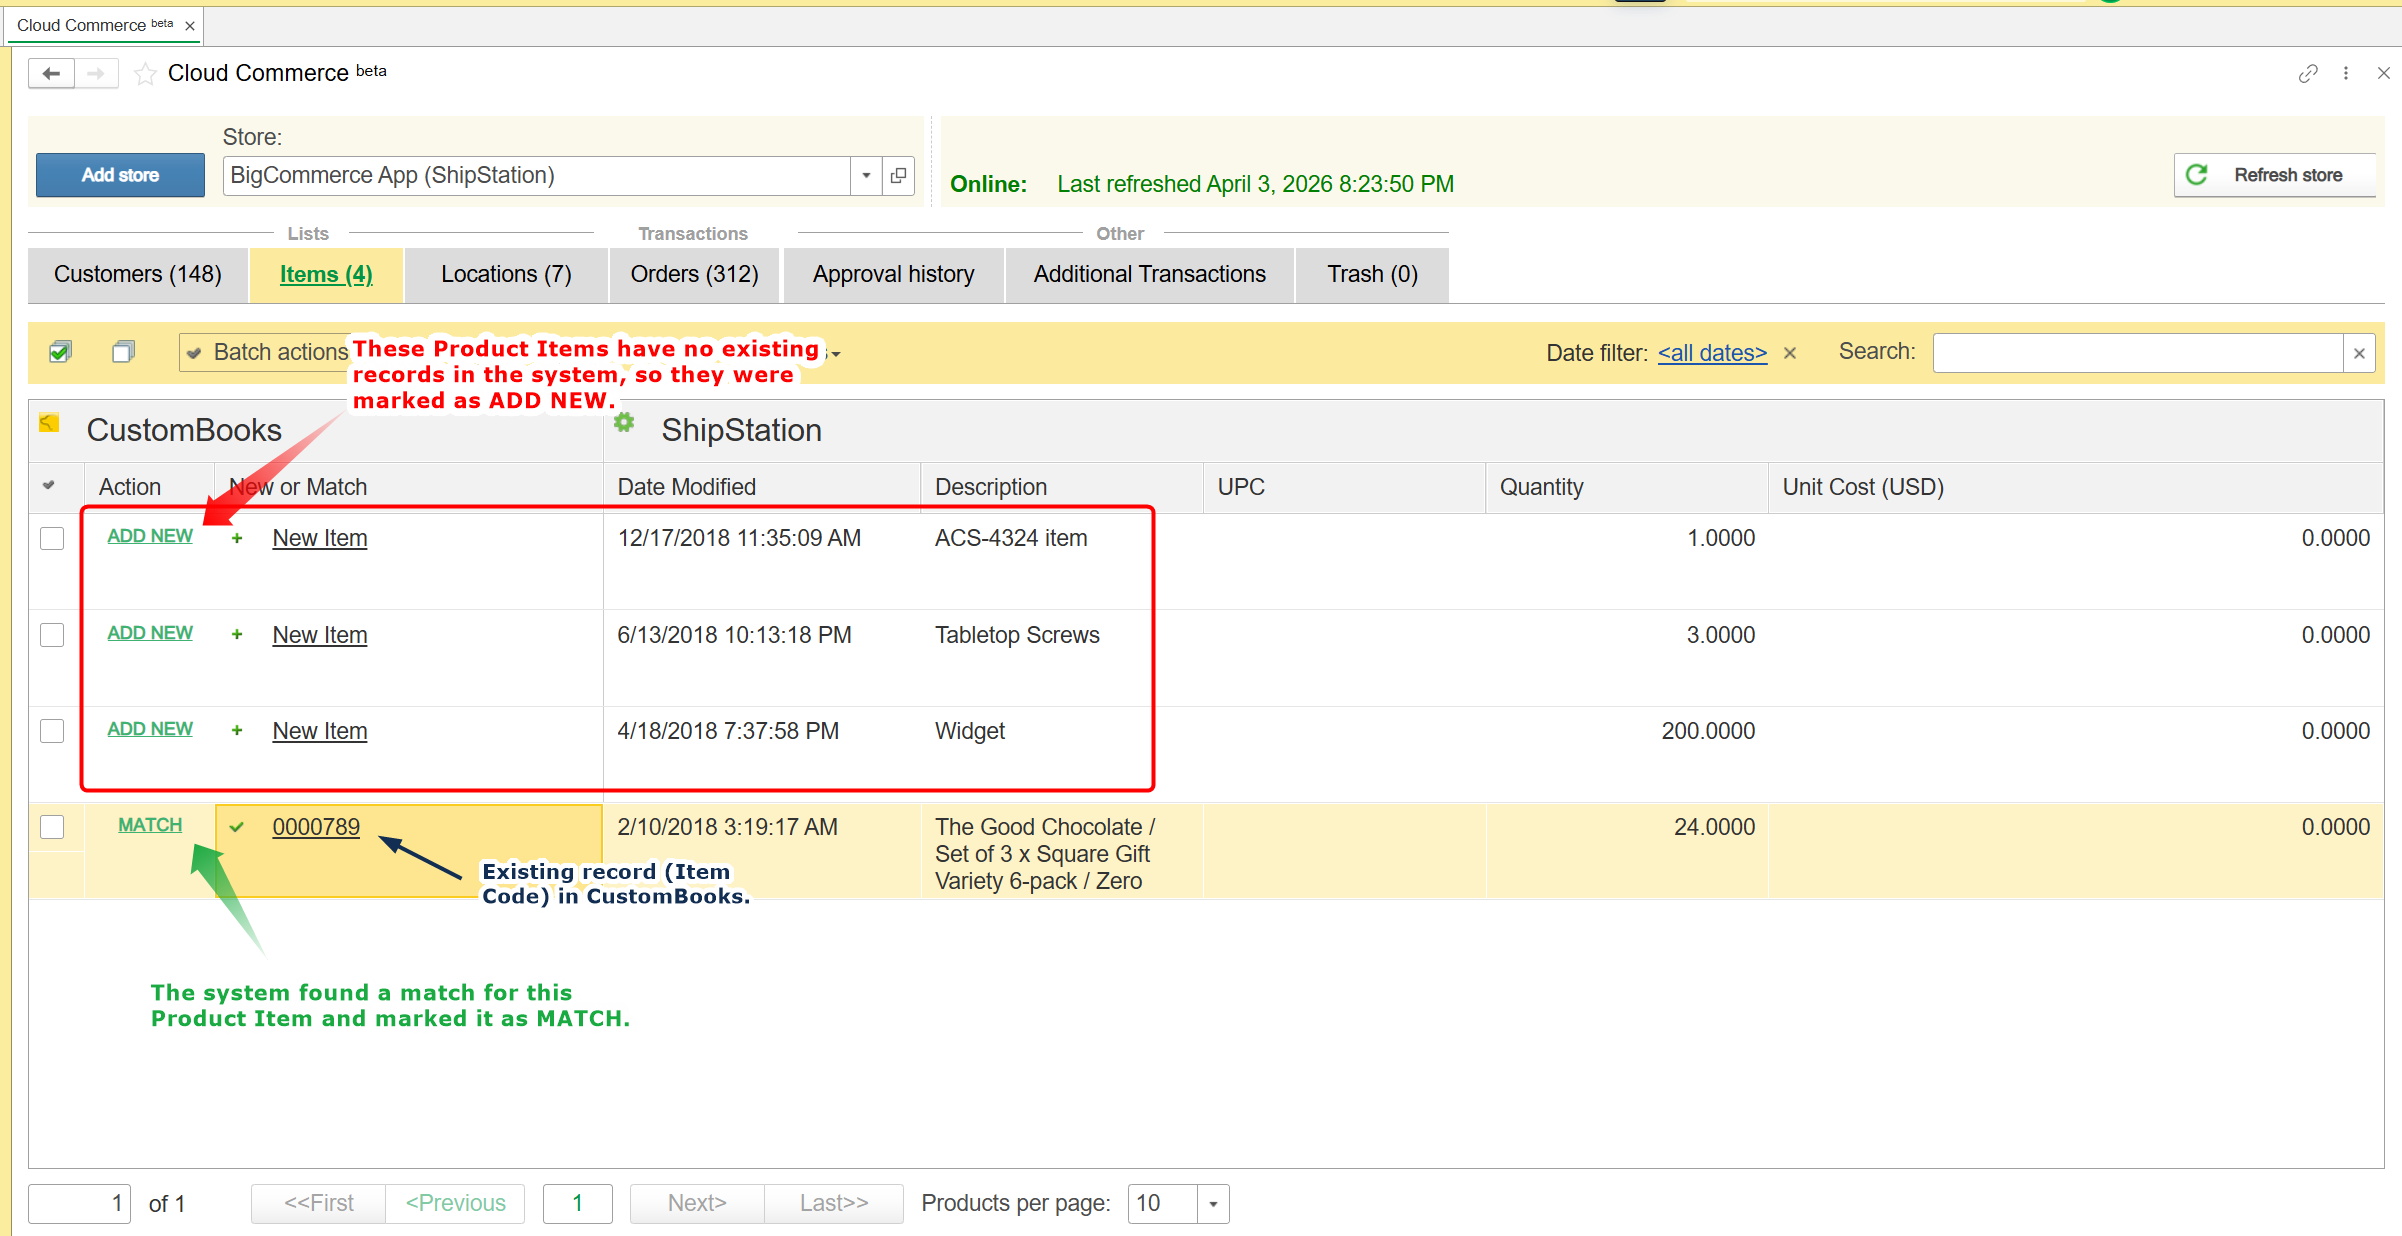
As orders flow in from your connected web stores or Square POS, CustomBooks™ places them in a staging area on the Cloud Commerce Dashboard. Here, the system carefully compares the incoming data to your existing records.
If the system finds an exact match, it labels the record as a MATCH. If no matching product, customer, or order is found, it flags it to ADD NEW.
Why do I need to approve them?
All orders, products, and customers must be reviewed and approved before they officially enter your accounting records. This crucial step ensures your books stay clean and prevents you from creating duplicate customers, double-listed items, or repeated orders.
The Approval Workflow
You can approve records one by one or all at once (in a batch). Here is the recommended step-by-step process:
- Choose Your Store: Select the store you want to work with from the Store dropdown at the top of the dashboard (or click Add Store if you haven't connected it yet).
- Review Your Foundational Lists: Use the navigation tabs to move through your data components. For the smoothest approval process, it is best to review and approve your lists in this specific order before moving to transactions:
- First: Customers
- Second: Items
- Third: Locations
- Fourth: Sales People (Square)
- Check Your Orders or Cash Sales: Once your lists are matched, click the Orders tab (for ShipStation/eCommerce) or the Cash Sales tab (for Square). This is your main "to-do list." Review the rows to ensure the customer and items are properly matched (look for the green "All items matched!" text).
- Approve the Transactions:
- To approve individually: Click the green ADD NEW or MATCH text in the Action column for a specific row.
- To approve in a batch: Check the boxes on the far left next to the orders you want to approve (or use the select all checkbox at the top left). Then, click the Batch actions button and choose Approve Selected.
- Auto-Create Additional Documents:
When you approve an order, a pop-up window titled "Auto-creation of additional Documents" will appear on your screen.
- The system will automatically suggest which related accounting documents to create based on the order's status. For example, if the order is already marked as shipped, the Shipment box will be automatically checked for you. Same if the order is already paid, the Cash Receipt box will be automatically checked.
- You can manually check or uncheck the available documents (Sales Order, Shipment, Sales Invoice, Cash Receipt).
- Click the yellow Proceed button to finalize the approval.
- Pro-Tip: If you always want these specific documents created automatically without seeing this pop-up every time, click the blue "Enable this as Default in Store Settings" link at the bottom of the window.
Once you click Proceed, the approved items will be removed from your to-do list, and the selected financial documents will be instantly and accurately recorded in CustomBooks™!
By using CustomBooks™ Cloud Commerce, you eliminate the hassle of manual data entry and ensure your financial records stay perfectly synced with your online and in-person sales. If you have any questions or need further assistance setting up your store, please reach out to our support team!
Related Articles
Need help applying this to your business?
See how CustomBooks™ can support your accounting and inventory workflow
If you are evaluating CustomBooks™ or want help setting up workflows for your business, explore the product or schedule a conversation with our team.
Already using CustomBooks™? Explore the Knowledge Base or contact support for product help.
Related Articles
Cloud Commerce: Connecting Square POS System to CustomBooks™
Overview: Connecting Square POS to CustomBooks™ Square Point of Sale (POS) is a versatile, industry-leading platform that empowers businesses to securely process payments, manage daily operations, and track sales across both in-person and online ...CustomBooks™ Product Perks: April 2026 - Cloud Commerce, ShipStation and Square
CustomBooks takes eCommerce to new heights with our Cloud Commerce tool, featuring seamless integrations with ShipStation and Square. Highlights of CustomBooks Cloud Commerce: Stable API connections with trusted integration partners: ShipStation and ...Integrations: ShipStation
Overview: CustomBooks™ Integration with ShipStation ShipStation is a widely trusted, web-based shipping and fulfillment platform designed to help businesses efficiently process, fulfill, and ship orders across multiple channels. By integrating ...Cloud Commerce Setup Instructions
Create an Account at itembase Go to itembase and create an account by clicking the “Sign Up” link in the upper right hand corner. Create your account and log in. Connecting your Webstore to itembase Search for and choose your web store. Click ...AccountingSuite™ Release Updates: Jack Russell 4: Cloud Commerce, Cloud Payroll and more!
Cloud Commerce Your Square sandbox account can now be connected in either your live or sandbox AccountingSuite account. Transactions approved from Square stores will now display transaction details on the Cash Sale documents that are generated. You ...